How To Expose For Interiors And Exteriors In Architecture Or Real Estate Photography - Part 1 - On Location

If you’ve shot architecture or real estate photography, you already know the rub…exposing for interiors as well as exteriors! It’s a finicky art all in itself. Starting when I lived in Los Angeles, sandwiched in my little hippie canyon between Malibu, Pacific Palisades, and the Hollywood Hills, and throughout my time after moving to the Pacific Northwest, I had the opportunity to shoot some very high-end real estate for some very high-end and particular clients, and through that process, I’ve learned some incredibly helpful methods to help pull off results that even surprised me! While it would look incredibly unnatural to have both exposed for perfectly, especially when shooting a scene where big windows are involved on a bright day with a to-die-for view in which blown out windows are just NOT an option, there are a few ways to do it that will please both yourself and the client. Most importantly, they can provide a very accurate and attractive representation of the space.
HDR is certainly one of those methods, but HDR in its traditional sense more often than not results in very unnatural surreal images. While they can sometimes (and I emphasize 'sometimes!') look pretty cool, they’re more often than not neither an accurate representation of what the scene actually looked like, nor do they represent any sort of (sober) reality anywhere on earth (and if they do…please tell me where…I’m moving!).
My preferred method was taught to me by Michael McNamara of ShootingLA.com, a client I did some occasional work for in Los Angeles and this method has changed the way I approach real estate photography and has made my job a LOT easier. In addition to your camera and obligatory tripod (a MUST), here are the things you’ll need:
1. A decent off-camera flash (with an optional bounce-card). Does NOT need to be name brand. I use the Yongnuo speed-lights and they’re MORE than capable and a third the price of name-brands. If you really want to get crazy, you can use a Cheetah Light or equivalent, such as the Cowboy Studio or Neewer versions of the same speedlights.
2. Wireless flash triggers such as the Pocket Wizards or what I use are Yongnuo RF-603 flash triggers. A pair cost me 30 dollars and they do just as good a job.
3. Adobe Lightroom software
4. Enfuse Plugin by Photographers Toolbox (donationware) or Photomatix Pro by HDRSoft ($99) or Skylum’s Aurora HDR, especially their updated 2019 version. While I used to use Enfuse, since the original publication of this article, I have begun using Aurora HDR as their tools have become infinitely better. Enfuse is certainly more economical and absolutely gets the job done, but Aurora HDR and Photomatix are much more detailed programs that give you more control over certain parameters that you might want to consider after you get the process down and are looking to advance to the next level. Also, as of the original date of this writing, Adobe has included a very very good HDR Merge feature directly into Lightroom, which is an excellent option as well.
Now when you’re in the space, find your shot, frame your shot, lock the camera on the tripod, and set it at an aperture you’re happy with for the size of the space to get everything in focus, typically between f7.1 and f11. Also, make sure you shoot in RAW to get the most latitude out of your data. Now, either set your camera to bracket 3 shots as if shooting HDR, or if your camera doesn’t have an automatic bracket feature, you can fire the brackets yourself - one exposure centered at 0, one exposure at a stop underexposed and one exposure a stop overexposed using exposure compensation. I typical expose for the mid-tone in the scene so as to preserve as many details as possible. And if the window is blown out, don’t worry, that’s where the fun part comes into play.
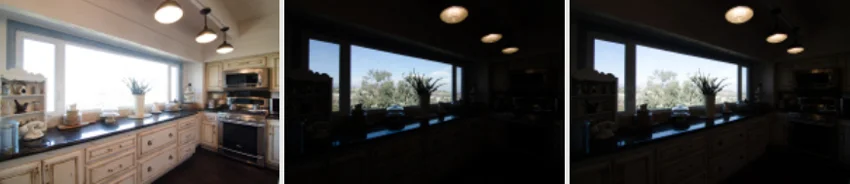
Once you have your base exposure and the two bracketed exposures, turn off bracketing, and turn on your flash and the wireless flash triggers. Set your exposure centered at 0 and move your focus/exposure point to expose for the brightest part in the scene (typically the window). Increase your ISO to somewhere between 400-600 in order to boost the sensor’s light sensitivity to absorb as much of the flash light as possible. Now fire an exposure using the flash as a bounce flash aimed off the wall either behind the camera or the ceiling above the camera if it’s white or a light color that will bounce the flash. If there is no light surface to bounce the flash, use the bounce card or a white piece of paper. If you did it right, what you should see now that you didn’t see in the brackets is the window frame or door frame detail, as well as the scene outside the window well exposed. If there are shadowed areas in the exposure, don’t worry, you’ve already exposed for those areas in the brackets. All you’re looking for here is a well exposed exterior scene outside the door or window with little to no light leak or fringing on the door or window frames. Sometimes, depending on the scope and size of the window or door and intensity of light, you might have to shoot that exposure at a stop underexposed. What you’re looking for is a result similar to following image:

For more advanced shooters and once you have this process down, you can even shoot multiple bounce-flashed exposures to expose for different parts of the room or space.
Next step is to post-process these exposures. I cover that process in How To Expose For Interiors And Exteriors In Architecture Or Real Estate Photography - Part 2 - Post Processing. In the meantime, go fire off a few images using the methods above so you can follow along with the post-processing techniques.
And if you’re in need of real estate photography services, whether commercial or residential, please feel free to contact me or check out my Property Photography website.
For more of my madness: Instagram: @wasimofnazareth Twitter: @wasimofnazareth Google+: www.Google.com/+WasimMuklashy Facebook: www.Facebook.com/WasimOfNazareth